
WELCOME TO THE Sew Lab
Inside the SewLab, each idea is carefully developed through fabric selection, design, embroidery, testing and construction. Some designs are translated into machine embroidery, while others are slowly formed by hand. Each follows its own process, but both are guided by the same intention: to create clothing that feels thoughtful, distinctive and worthy of the memories made while wearing it.
EVERY PIECE BEGINS WITH AN IDEA
1. INSPIRATION

A design may begin with a childhood memory, a natural form, a familiar Bermuda scene or an imagined character. These early ideas are explored through notes, sketches and visual references until the story of the garment begins to take shape.
2. FABRIC SELECTION
The fabric is selected for more than its appearance. Its softness, weight, movement, durability and suitability for embroidery are all considered. Natural fibres and comfortable textures remain central, ensuring that the finished garment is as pleasant to wear as it is beautiful to see.
3. DESIGN DEVELOPMENT
The initial idea is refined through sketching, colour planning and careful consideration of placement, scale and detail. Each element is developed to complement the fabric and silhouette, ensuring the embroidery feels like an intentional part of the garment rather than an addition.
FROM HERE, THE PROCESS FOLLOWS TWO PATHS
THE MACHINE EMBROIDERY PATH
An original illustration is translated into carefully programmed stitches.
THE HAND EMBROIDERY PATH
Embellishments that evolve slowly, one stitch at a time.
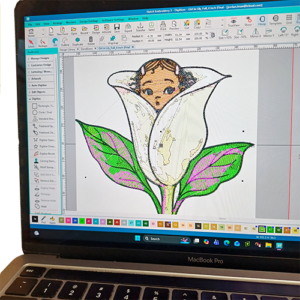
01. Digitising the Design
The original artwork is carefully translated into a digital embroidery file. Each shape is assigned a stitch type, direction, density and sewing order so the design can be stitched cleanly while remaining soft and suitable for children’s clothing.
02. Thread and Colour Selection
Threads are selected to complement both the fabric and the character of the design. Colour, contrast and tone are considered together to ensure the finished embroidery feels balanced, distinctive and harmonious.
03. Testing and Perfecting
The design is stitched onto test fabric to assess its scale, density, colour placement and overall finish. Adjustments are made as needed until the embroidery sits smoothly on the fabric without becoming stiff, distorted or overly heavy.
04. The Final Stitch-Out
Once the design has been refined, it is stitched onto the prepared garment fabric. Careful placement and stabilisation help ensure the embroidery appears exactly where intended and becomes an integrated part of the finished piece.
01. Preparing the Design
The original idea is refined into a design suited to hand embroidery. Its scale, placement and level of detail are carefully considered before the artwork is transferred onto the prepared garment fabric.
02. Thread and Stitch Selection
Thread colours and stitch types are selected to complement the fabric and bring depth, texture and character to the design. Each choice is made with the finished garment’s softness, balance and overall appearance in mind.
03. Hand Stitching
The design is slowly brought to life, one carefully placed stitch at a time. The natural variations created through handwork give each embroidered piece its own distinctive character.
04. Finishing the Embroidery
Once the stitching is complete, the embroidery is carefully reviewed and any remaining markings are removed. The fabric is then prepared for construction so the finished design becomes an integral part of the garment.